I’m excited for the new year and looking forward to some really exciting changes. With only five months left in Dallas, I’d really like to amp up my sewing and get into a nice groove before I move to Seattle in June. Most of all, I’d like to spend more time sewing this year and less time just thinking about sewing, as has been the major trend in years past. At the same time, I want to keep my goals attainable. With that in mind, here are my aims for the next year.
1) Sew from my stash! My stash is enormous…like embarrassingly large…like if I keep sewing at my current rate and never buy anything new, I’ll have to live until 2189 to use it all up. Not only will I have to pack up and move all of that in June, but I’ll also have to find somewhere in my lovely but petite new crafting space to store it all. At this point, I’m making a shorter term goal of buying no new fabric or sewing patterns until after I move. I’ll look to my stash first for zippers and notions, but those are allowable in order to finish a project.

My hoard…err…stash(!)
2) Finish at least two projects a month. I’m so impressed by ladies who can churn out 50+ garments a year. Earlier this year, my goal was to make something once a week, but that just turned out to not be realistic for me. Although I’ve been sewing for several years, my workaholism has made my sewing schedule very erratic and I actually haven’t acquired that much experience. Trying to keep up with more skilled seamstresses has stressed me out. I’m slow. I’m accepting it, moving on, and setting a more realistic pace for myself.
3) Finish five or more Craftsy classes. As additional proof of my hoarding tendencies, I’ve accrued a large number of unused Craftsy courses over the past few years. If something I like goes on sale, I buy it, regardless of whether or not I’ll actually have time to work on or finish it. I want to make it through as many classes as possible, either sewing or knitting.
4) Finish two sewalongs. I love sewalongs. I love seeing what people make. I love step-by-step tutorials and ideas for variations. I love signing up for them. Unfortunately, something always comes up and I have yet to finish a single sewalong. This year, I’d like to participate in two! I’m also making this my one exception to the no new patterns/fabric goal, but only once.
5) Participate actively in the online sewing community. I’ve been a longtime lurker on the edges of the blogosphere. I’ve been reading and sewing, but rarely commenting or blogging. I don’t know if I’m quite up to joining Twitter, but I would like to start blogging more regularly (at least 75% of my makes?) and commenting more on the awesome things other people are doing/writing. No more creepy lurking for me!
As part of my collaboration with my awesome friend/sewing teacher Julie, I’m making up samples for her upcoming sewing classes. First up? The Colette Peony. This is not only a fun opportunity to try out some new patterns, but it’s also forcing me to make some muslins (even if they are of the fully-finished-and-in-beautiful-fashion-fabric variety). So here’s my first crack at the Peony.

Please excuse the photos…I’m a first-timer with the tripod/timer. I guess the only way to go with my photography skills is up. Haha.
Among the many, many Craftsy classes that I’ve signed up for, one is Lynda Maynard’s Sew the Perfect Fit. Because I’m a giant nerd, I like to watch sewing-related video while sewing. Sometimes it’s Project Runway, sometimes a selection from my vast Craftsy library, (and sometimes when I run out of sewing material, it’s a Nova documentary on Neflix). As I was sewing my Peony, I was watching Lynda’s class. The class uses Vogue 8766, which is very similar, IMO, to the Peony pattern. When I tried on the dress bodice and the fit was not at all to my liking, I decided that I should just go for it and put my class to use.

I like the shape of this dress a lot better than I thought I would, although the fit in the pictures looks much worse than it did in my head. Tee hee. I think the back looks alright, except for maybe the weird wrinkles from the way I’m standing? I thought I liked the skirt, but I’m not sure I’m a huge fan of how it looks in action.
I don’t think that’s the most flattering on le belly, but the waistline looks way too high for me. Or maybe I just need Spanx? No, no, my fitting mantra is that I need to adjust my garment to fit my body, not the other way around. So back to the garment. Here’s the offending bodice:

It’s not exactly a head-on shot, but you can see the extreme pulling between the darts. It doesn’t look as bunched up as it does in the other pics, but those darts are an issue. I think the lower ones need to be moved apart to take care of the pulling. The upper darts are also way too high; they’re over an inch above my bust points.
The shoulder and arm holes are another area of concern.

Trying to lift my arms is not a fun experience. 😦 I’ve also got the back neckline gaping that others, like Rochelle, experienced during the Sew Colette 2.0 Sewalong (I hope it returns soon, btw!).

Sooo…lot’s of work on the fitting of this one, but I’m excited to learn! I’ve already starting amassing a library of fitting tomes. Mwahahaha!
My plan from this point is to make an actual muslin that I can cut up and manipulate. As I took these pictures and bebopped around in this dress, I made some notes of fitting issues I’d like to address in that muslin:
– Lower the upper bust darts
– Move out the lower bust darts
– Move out the shoulder seam
– Deepen the back darts
– Add the sew-in gusset that Lynda talks about in the fitting class
We’ll see how it goes from here! I’ve never worked on adjusting the fit of anything before, so this should be an exciting new adventure!
I’m working away steadily on details of my studio. I’ve moved over almost all of my vast fabric collection. I moved almost all my supplies over as well. My main goal now is to get them organized and stored.
To that end, I’ve made a few trips to Target, Walmart, and Joann’s over the past few days (although I mostly went to Joann’s for the 70% off notions and muslin…so many sewing machine needles and beaucoup de bobbins for the new Pfaff). I did some shopping this morning, then I settled in for a few DIY projects that were waiting for me on my Pinterest boards.
First up, some terrarium book ends to punctuate my pattern collection. I got the idea from here and found some clearance sheet moss at Joann’s. My boyfriend and I joked as I was making the first one that it was a “five-foot terrarium” (i.e. only looks good from five feet away), but I’m happy with the finished products. Not only that, but they were pretty darn cheap and making both of them took less than ten minutes combined. I also like that they’ll add some earthiness to the bordering on over-the-top girliness of my space.


I also went on a spray painting rampage! Spoiler alert: I am not a good spray painter. I’m really bad about getting too close and staying in one place too long. Guess I need to practice. First, I’m working with some more mason jars. I’m using this tutorial to make a glittery jar, but I also decided to make a couple designs of my own. I got some cheap stickers at Joann’s and made a polka dot one, then used painter’s tape I had laying around to make a striped one. They’re still sitting out on the lawn where I painted them, so I’ll have to wait until tomorrow to see how they turn out.

My other spray painting project is this folding chair upgrade. I’m afraid this is where my poor spray painting skillz are really on display.

I ran out of paint to do another coat, so I’m going to have to finish it up tomorrow.
My final project was a super-duper quick one of my own making. I was at Target yesterday searching for organizing containers for the studio, when I came across a simple, craft paper pencil holder (with white chevrons inside its four compartments). Conveniently located in the same aisle was some washi tape in the same color palette as the studio. I simple covered the pencil holder with the tape. This was another under ten-minute craft that I think turned out pretty cute. I’m pondering covering it with Modge Podge just to seal the tape on, but I’m afraid I might end up with a sticky finish like I have in the past with some other MP projects. I’ll see how my glitter jar turns out (it calls for MP) and make a decision then.

I’m hoping to get to the studio tonight and finish a first draft (not quite a muslin) of the dress I’ve been working on!
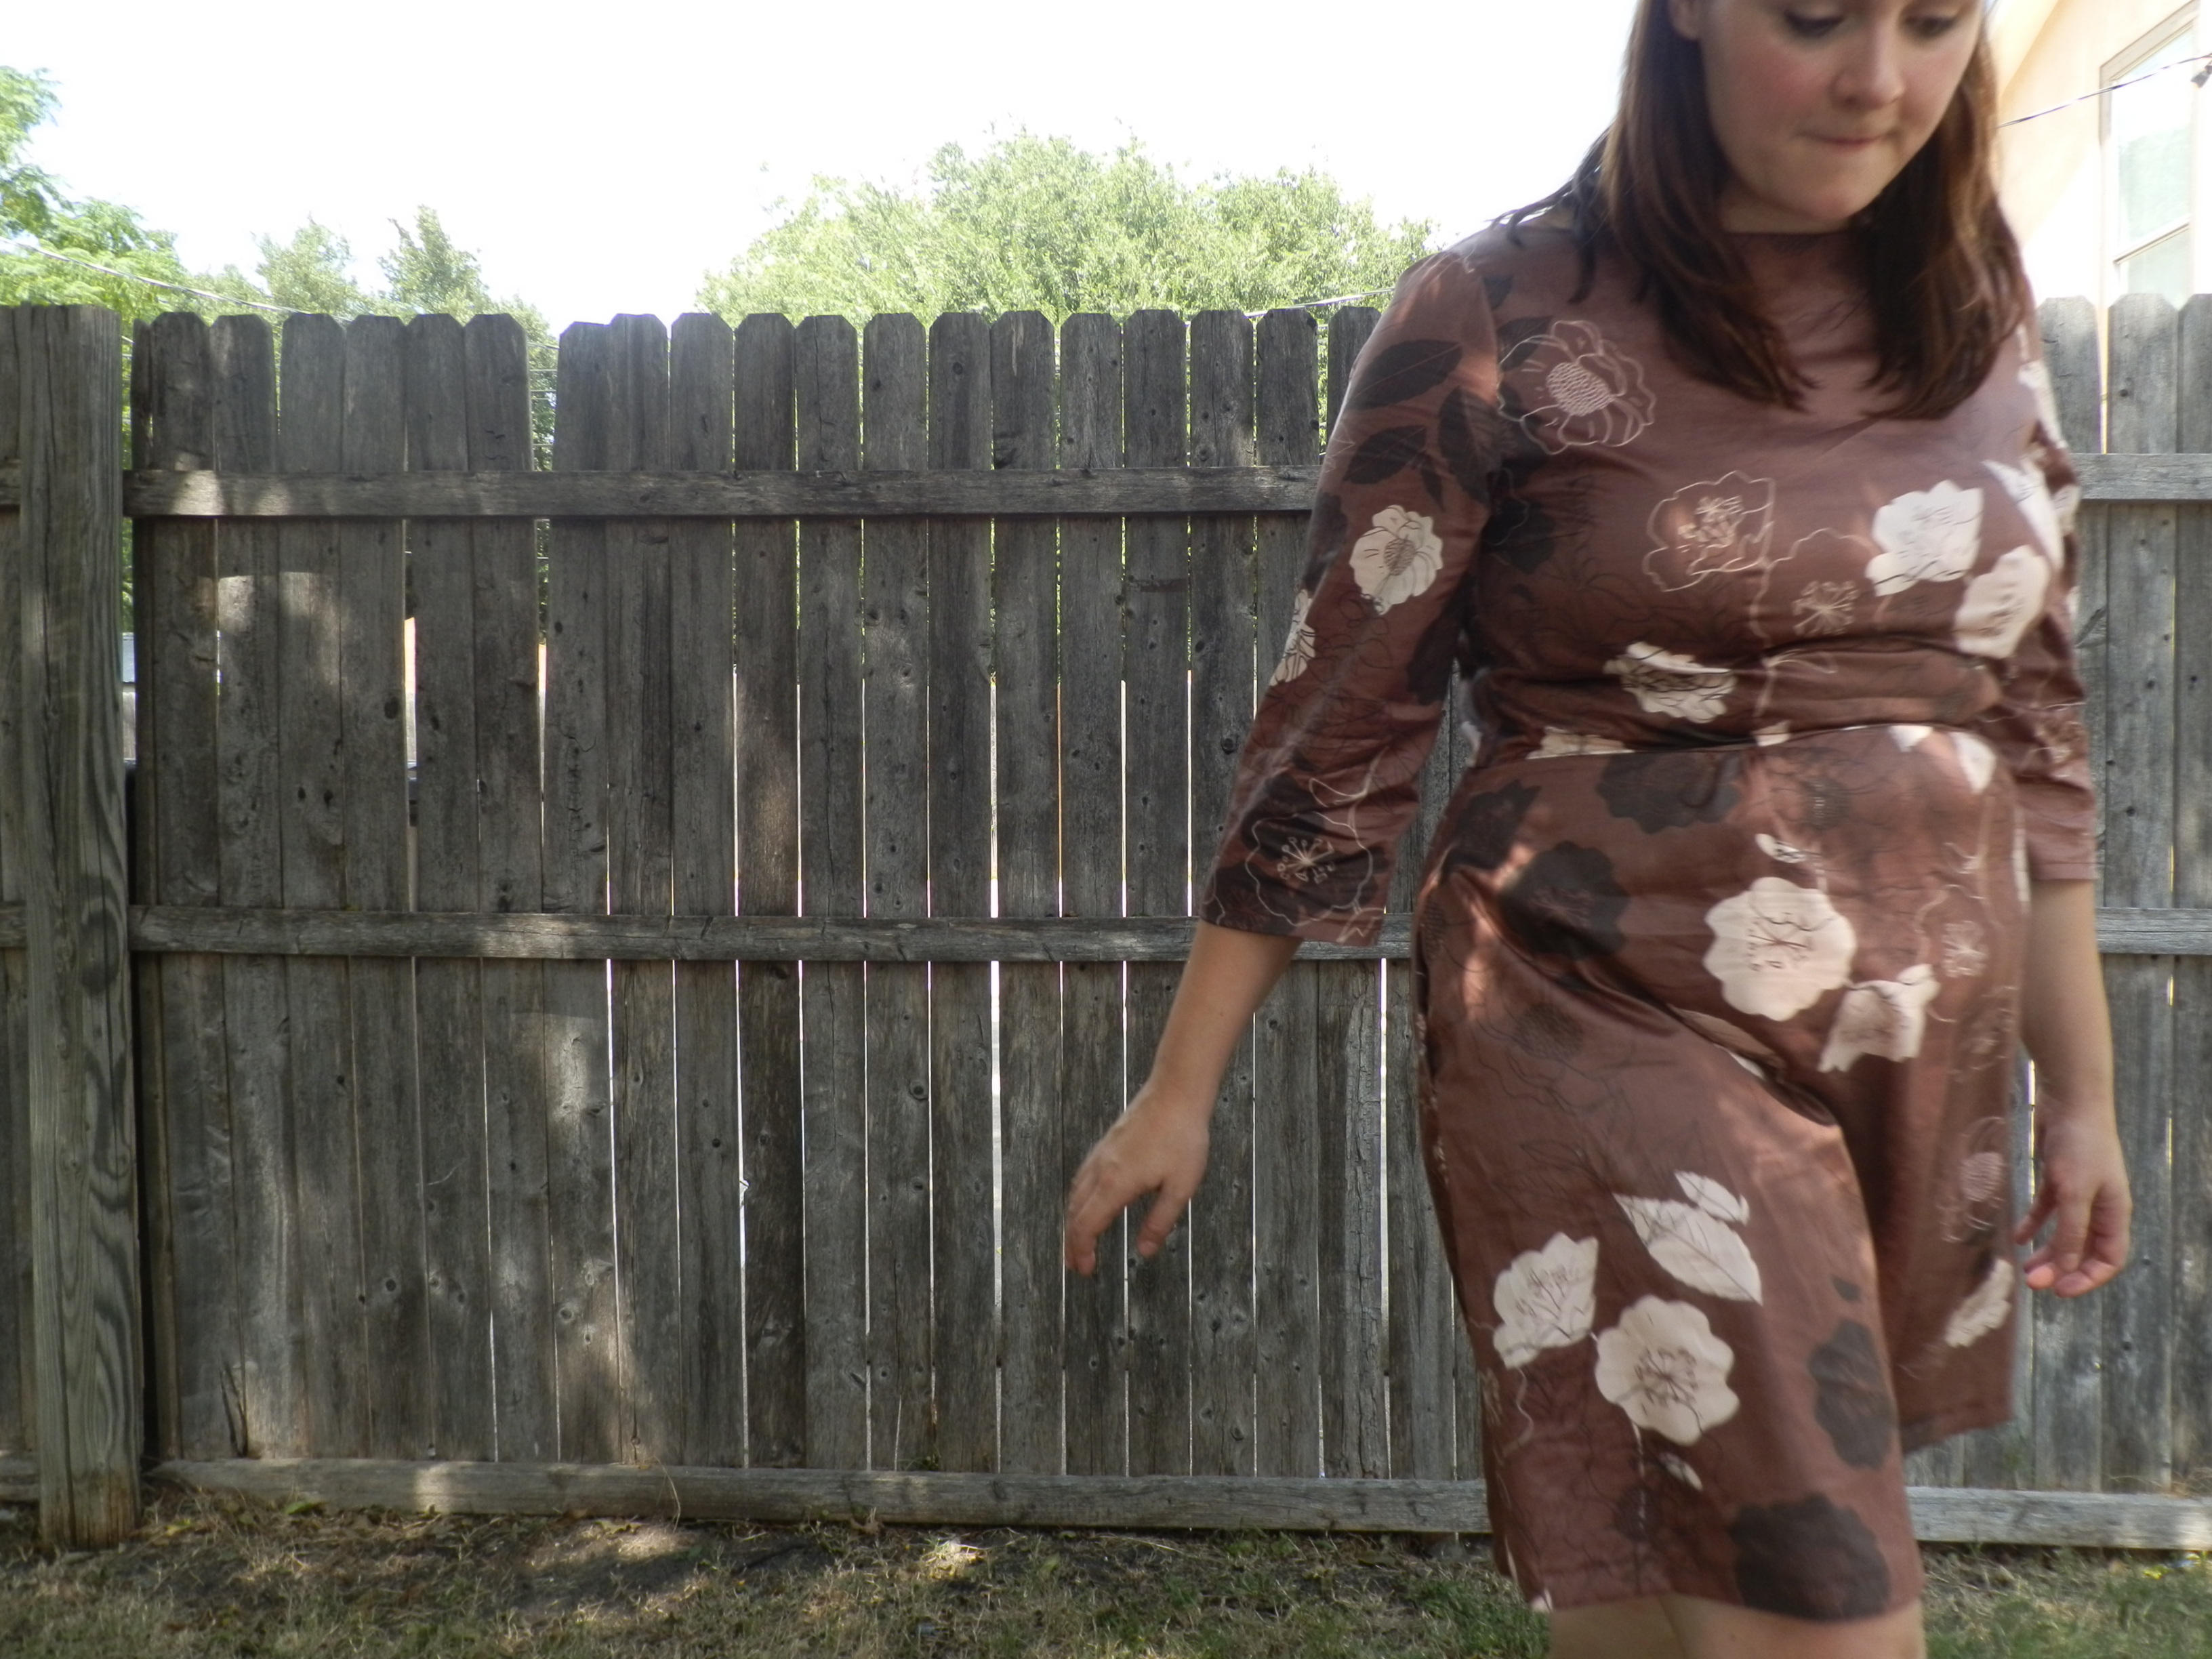
So, I finally got around to finishing and photographing another dress. This is the third laurel that I’ve made, but the first that I’ve photographed. The motivation to actually get my butt in gear came from the Hart’s Fabric Laurel Sewalong. I was too busy with end-of-the-year teaching busy-ness to join in the Colette brouhaha, so I was excited to get a second chance, especially since I loved the Laurel pattern and Hart’s Fabric. I’ve loved everything I’ve ever purchased from them. So much so, in fact, that these cuts usually get tucked away in the stash for a special occasion, or when my sewing skills are better, or some other litany of excuses. This contest was a great opportunity to actually make something with some of their lovely fabric. 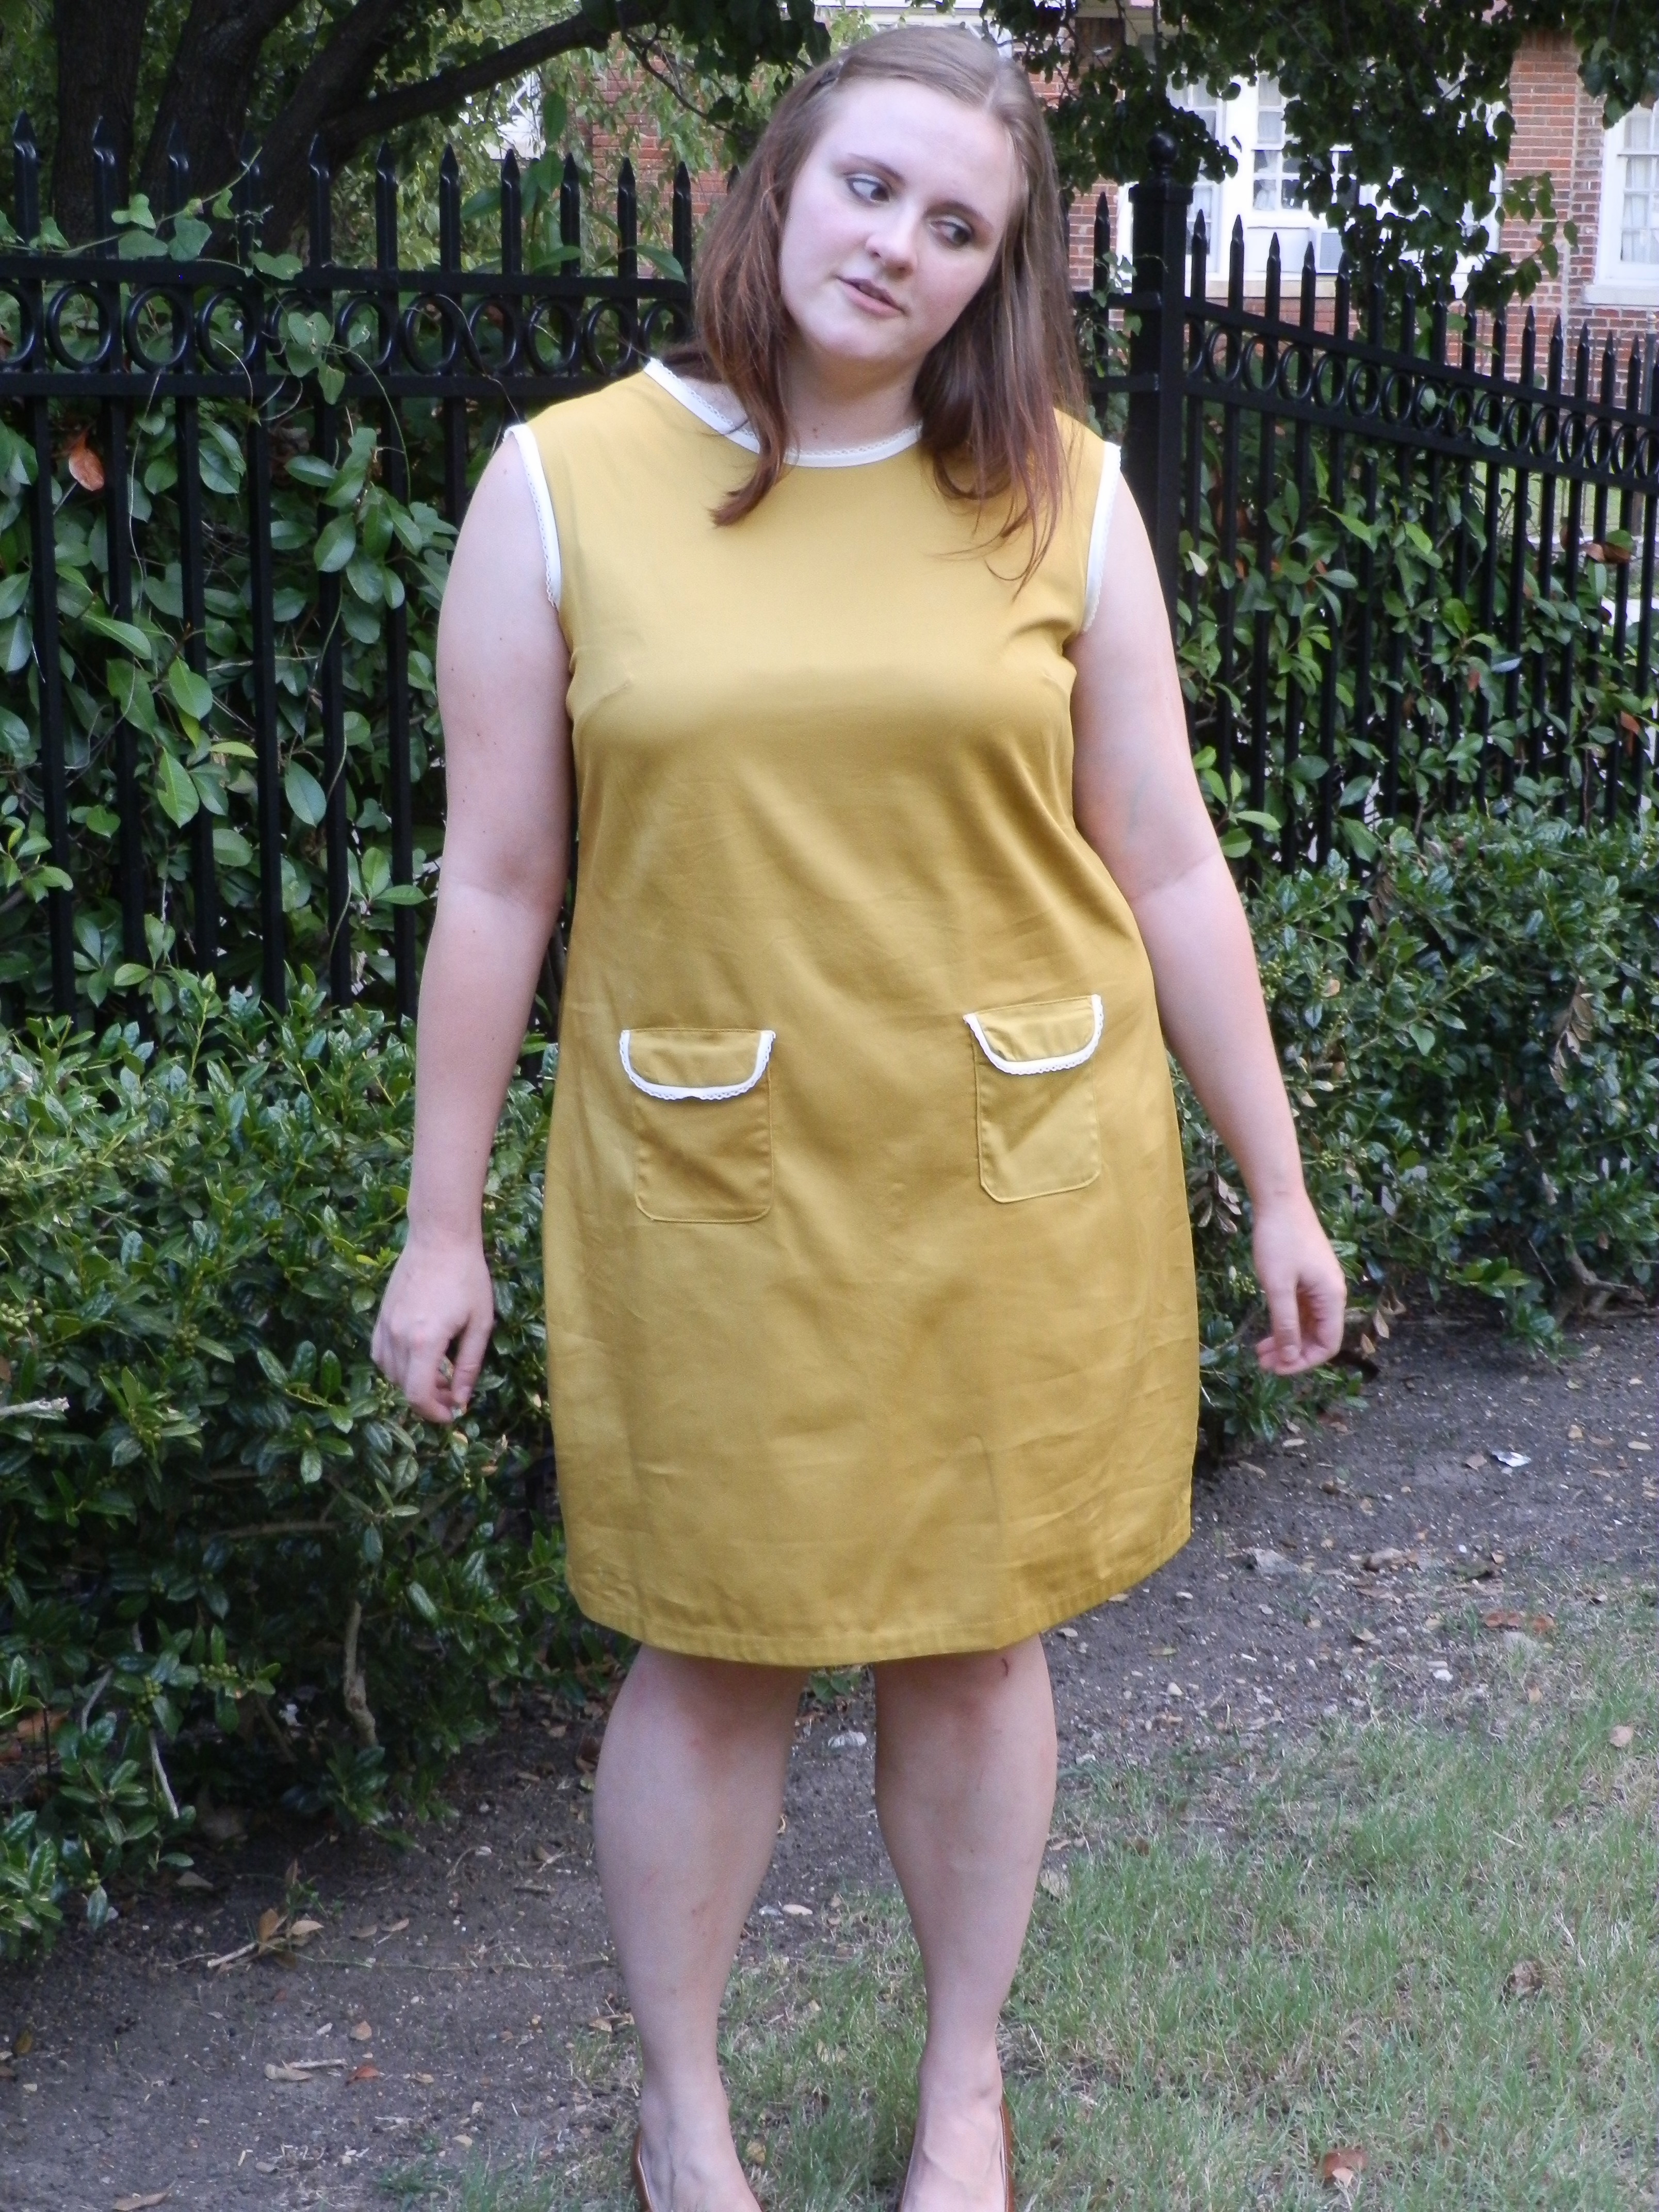
(Please ignore the weird facial expression…new to posing)
Initially, I ordered some navy blue cotton with a bit of stretch (listed in their suiting fabrics) and some crochet trim bias tape. They called the next day to say that they unfortunately were out of that fabric, but thankfully it came in another color. I’m actually glad that I ended up with this mustard shade. It’s adorable! 
This is my third Laurel iteration, so I knew that I could safely omit the back zipper. I used Sunni’s Craftsy zipper course to insert a lapped zipper in my last Laurel. The results were awesome, and I strongly considered doing the same on this dress just because it’s so aesthetically pleasing, but my laziness won out in the end, and I just sewed the back seam together.
The only tricky part of the construction of this dress was in adding the bias tape. The adorable trim is a double fold bias tape, so I thought using it to bind the edges would be a snap (I’ve done it before, and I was referring to the Colette Laurel Extras booklet, so I didn’t anticipate any difficulties). 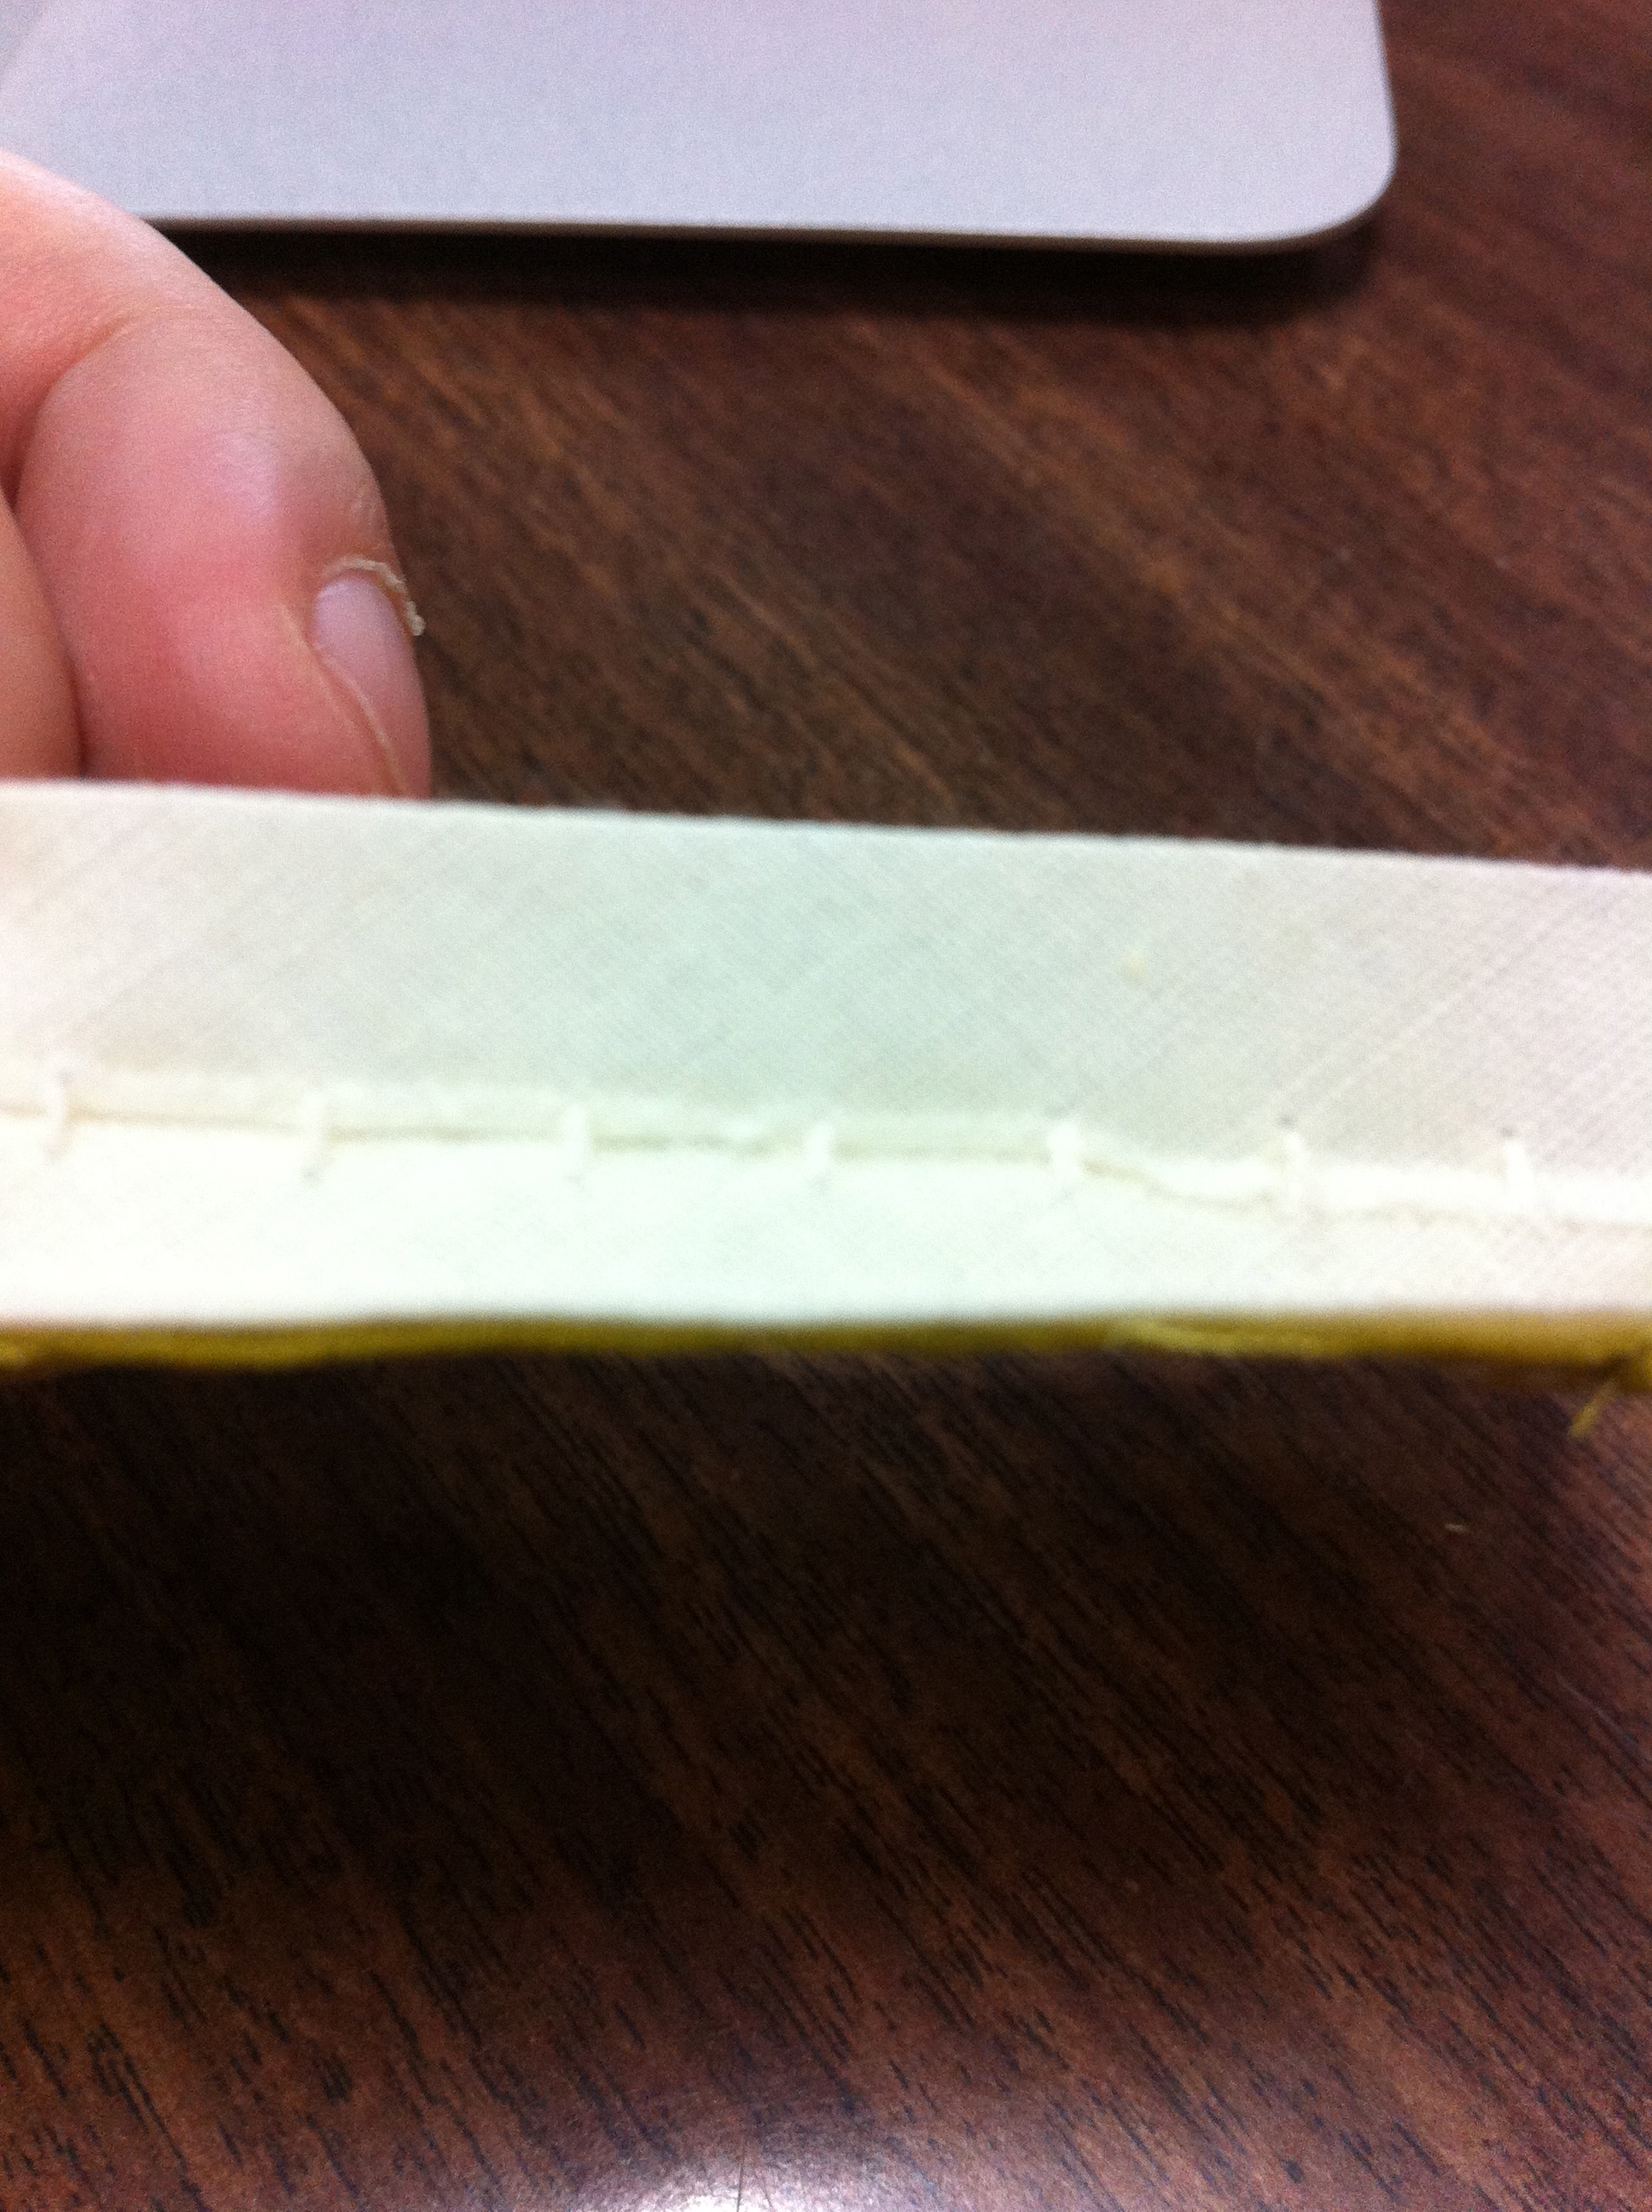
However, with the crochet trim, the two raw edges of the bias tape were actually sewn together in the center, thus preventing me from using the usual methods for attaching the tape.

On the pockets, I added in extra folds and created a sort of quadruple fold bias tape. I was reasonably happy with those results, but didn’t want that look or that extra bulk for the neck and arms. A very, very cursory Google search didn’t turn up any relevant tutorials, so I just kind of made things up as I went along. 
I tried to line up the fabric so that the raw edge lined up with the middle of the bias tape (or as close as I could get it).

Then, I pressed the other half of the tape down around the raw edge to make a binding and edgestitched it. I’m pretty pleased with the results!

All in all, the dress went together pretty easily (although my patch pocket skills definitely need some work). The most traumatic part of the process was when I was ironing the dress for the photo session and a black mystery stain appeared out of nowhere near one of the pockets. A minor freakout, Spray and Wash, and several hours of drying time later, and thankfully everything turned out OK.
So, I’m still super-excited about getting things at the studio in order, and I’ve actually done some sewing there as well. My dear boyfriend helped me put up the slat wall. I’m still not as handy with the screw gun as I’d like to be. ![]()

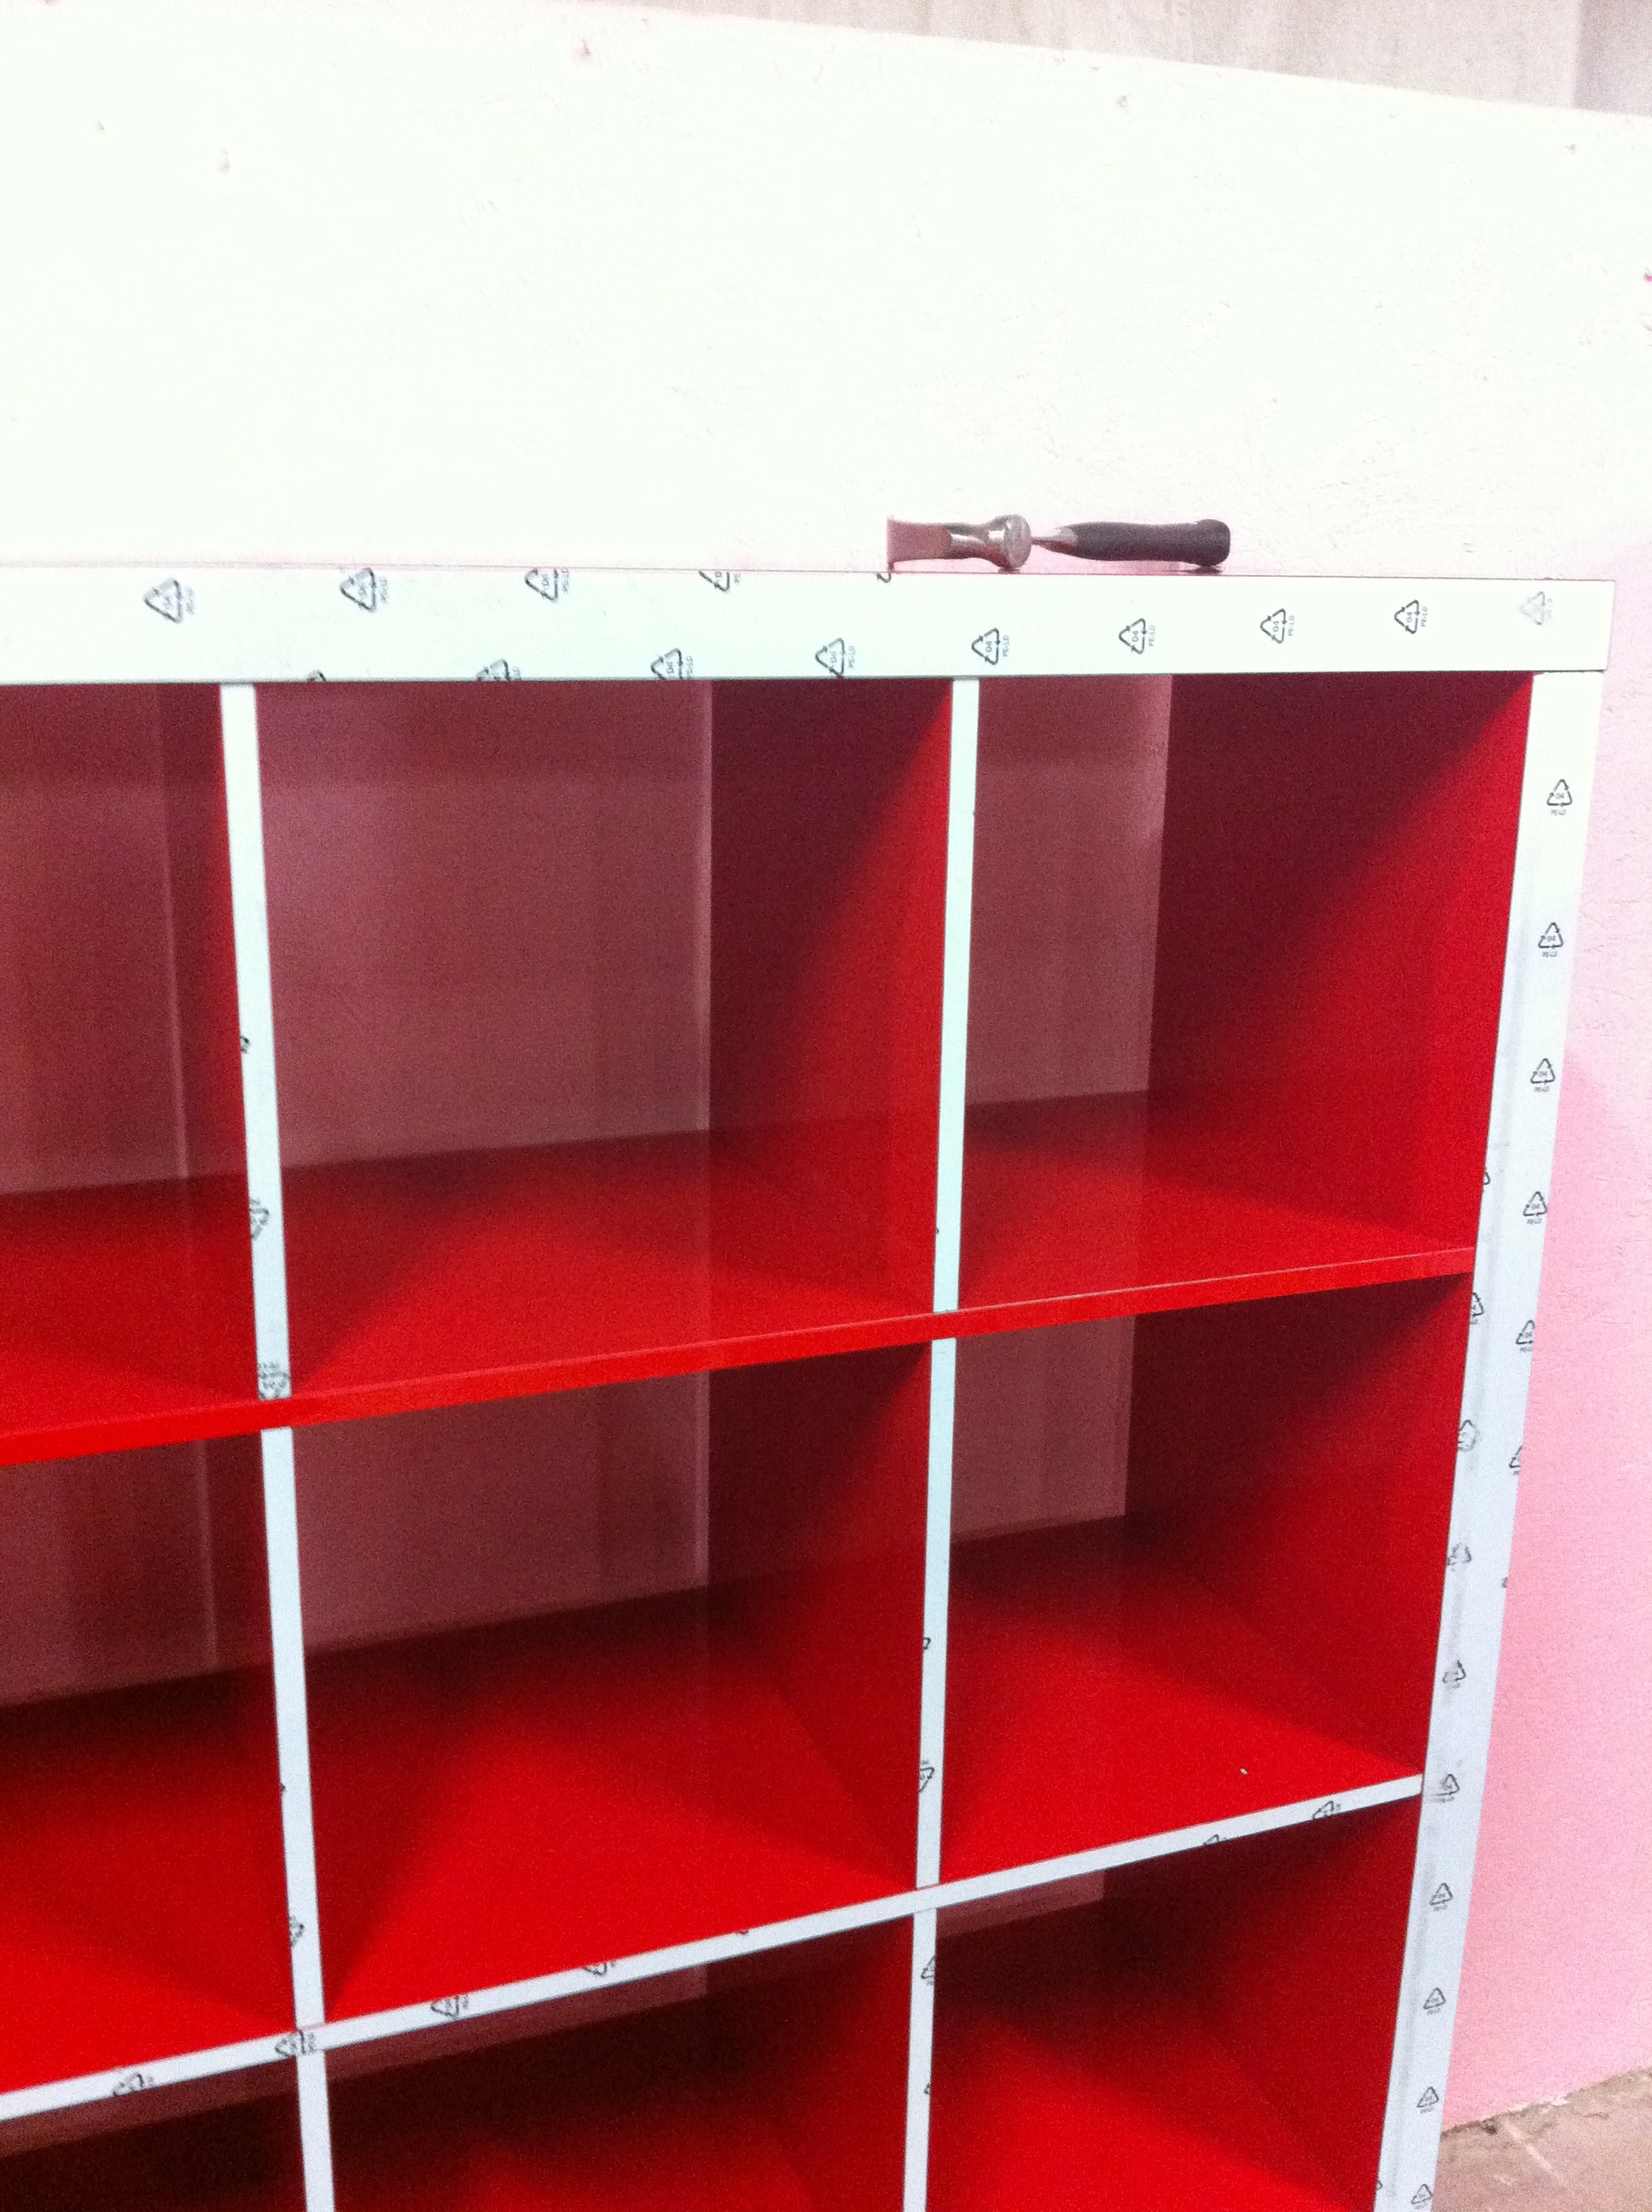
He also helped me build some Expedit shelves. I tried to no avail to find some on Craig’s List, and I couldn’t resist the shiny, shiny red when we were at Ikea buying a dresser. I like that all the cubes will help with fabric organization. My boyfriend likes that the massive stash will be relocating out of the apartment.
I also took the time to paint the thread and spool cone organizers that I picked up during Coupon Commotion at Joann’s. It was a somewhat tedious endeavor, but I’m pleased with the results. They look super-cute hanging up in the studio, although the decision to screw-gun them to the wall was perhaps ill-advised. They barely held up to the strain, but they hung in there!

Things are really coming together. I’d like to paint/recover a folding chair, possibly make some bunting or a paper garland, and procure some book ends to help with pattern storage. And then there’s the matter of moving and organizing all the fabric. I’m trying to take it a little at a time, and I’m excited to get some actual sewing done along the way.
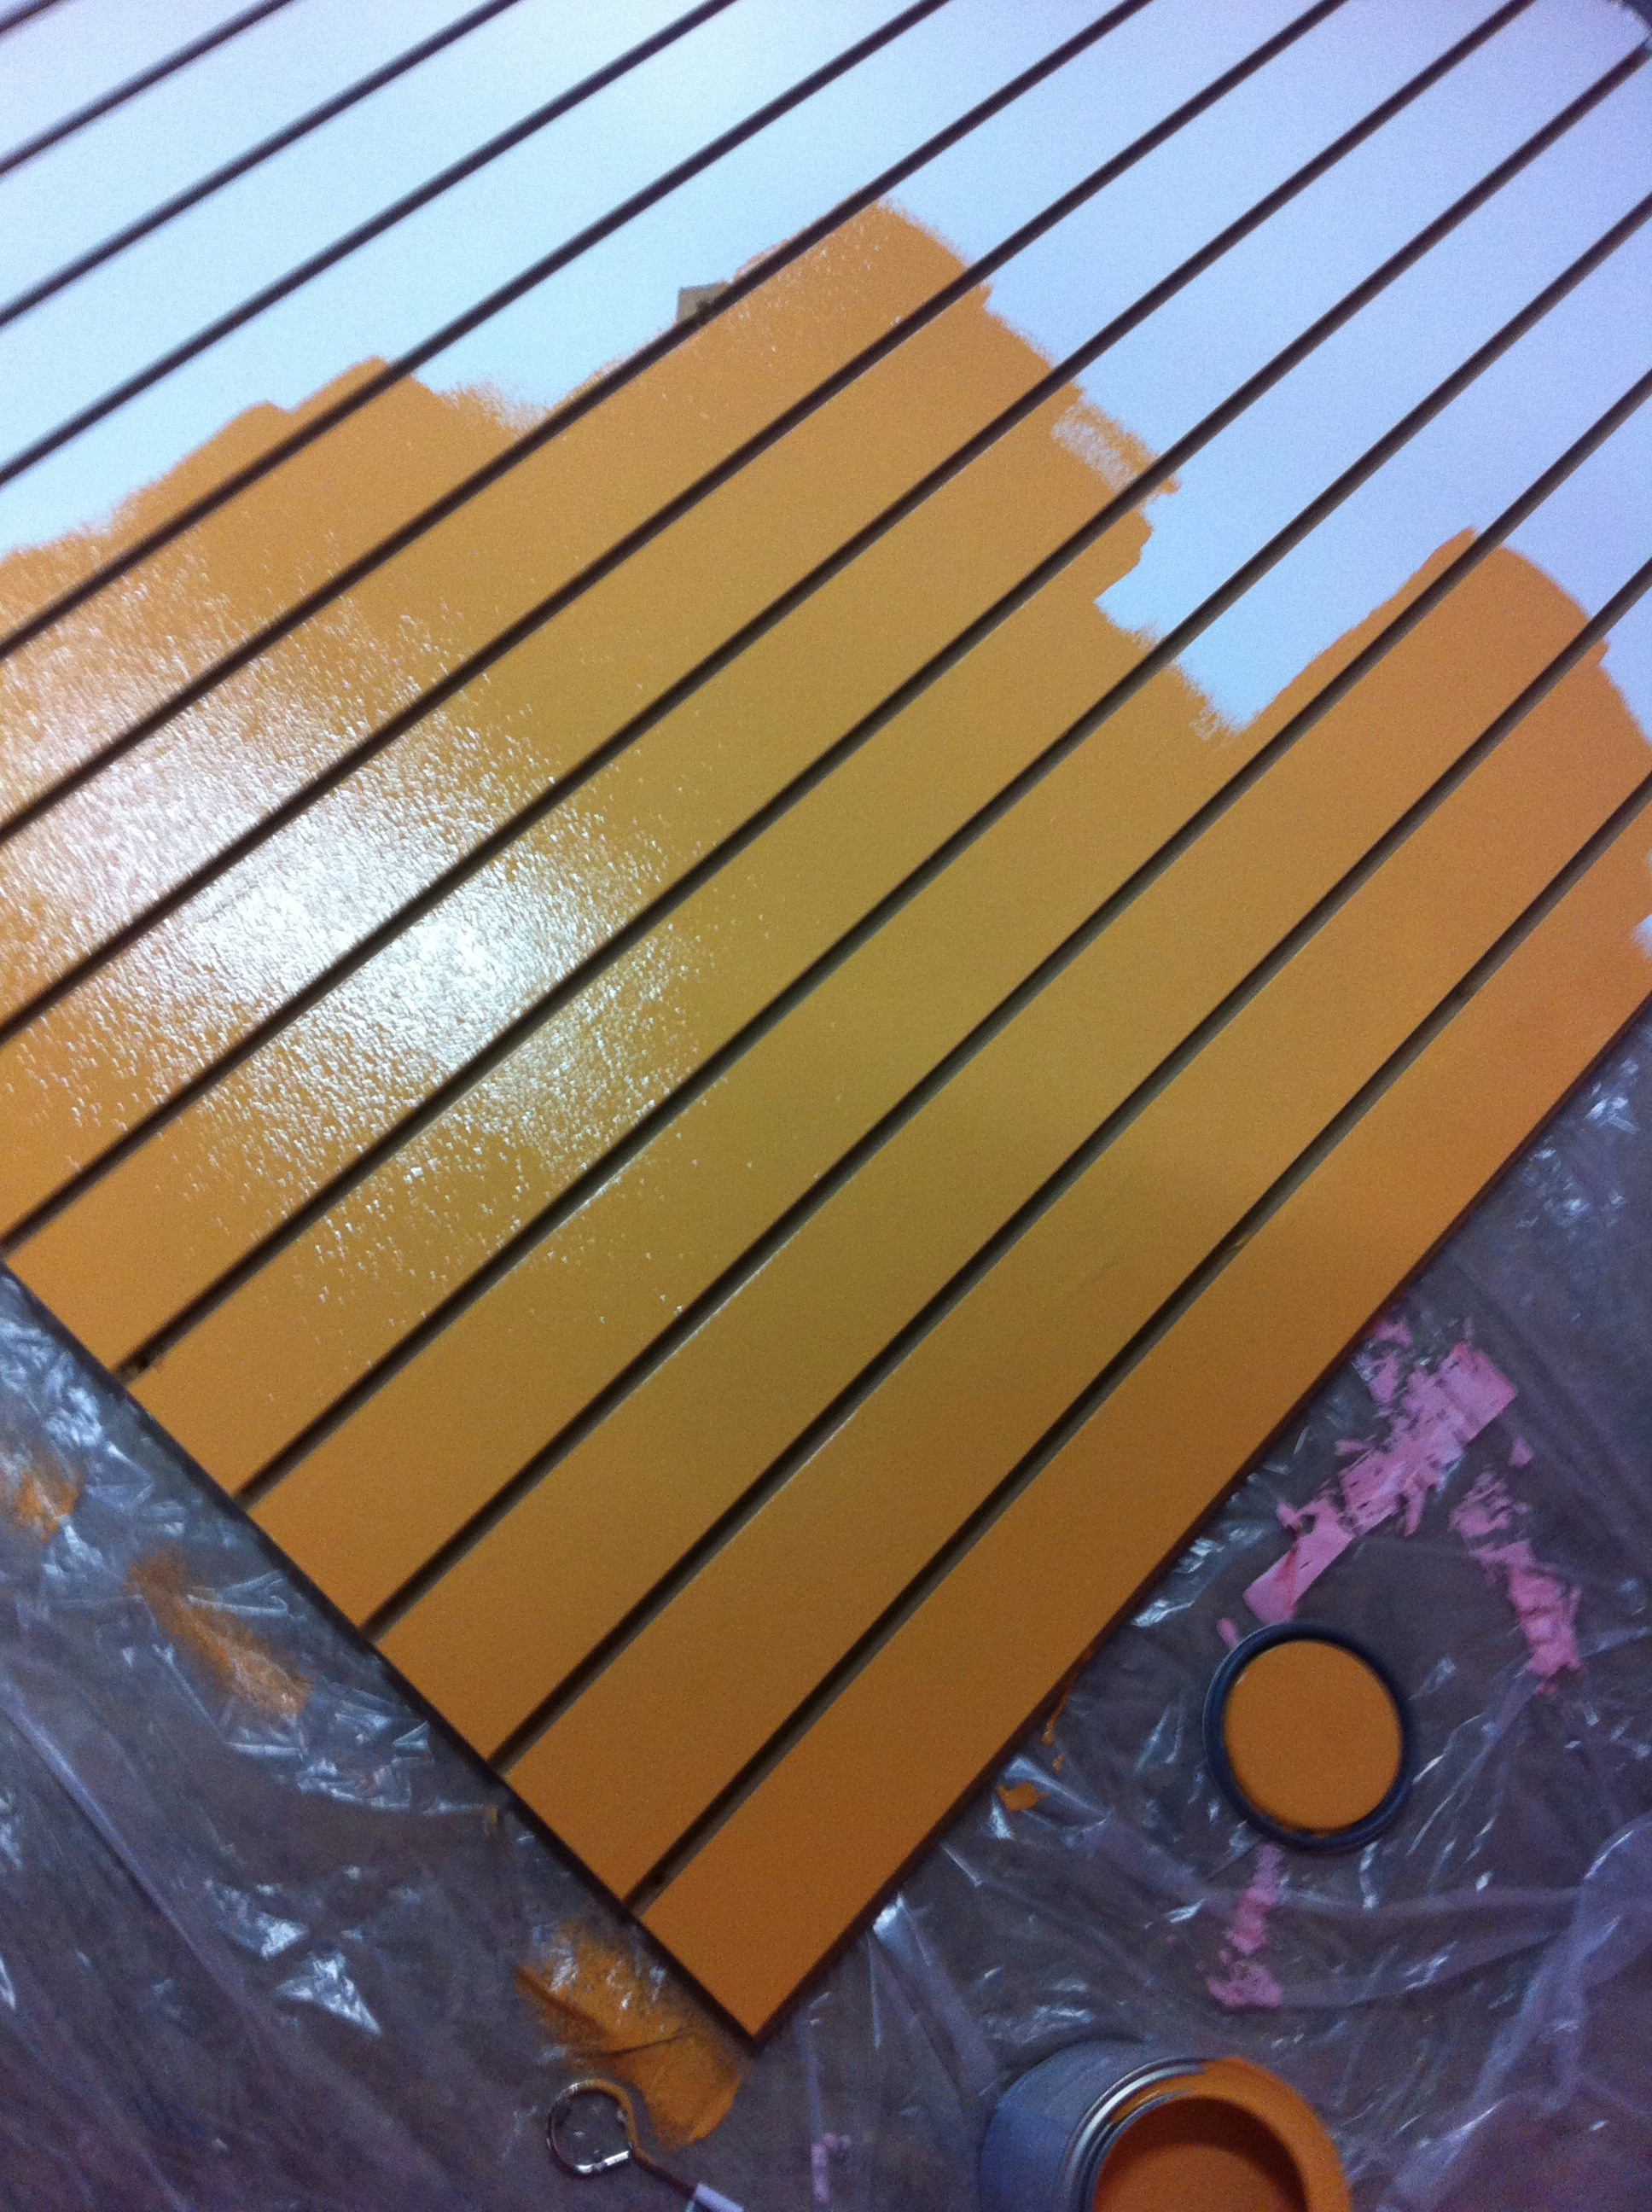
And the studio excitement continues! I’m really eager to get my stuff moved over, but I wanted to get some painting done first. After scouring Pinterest for a suitable color palette, I ran over to Lowe’s and grabbed some paint chips:

I decided to do the walls in pink and my slat wall in orange, with mostly red and aqua accents. I also used a combination of tutorials from A Beautiful Mess and Martha Stewart to DIY up some chalkboard paint, so one of my walls is a pink chalkboard! I found out a bit too late that Lowe’s offers tintable chalkboard paint, but there was something incredibly satisfying (albeit stinky) about mixing up my own chunky paint/grout paste.
 Today, I spent the day fabric shopping at Golden D’Or, an insane fabric warehouse here in Dallas. There are crazy deals to be had, especially at the remnants table, where all remnants (up to about 4 yds!!!!) are $1/yard, meaning that you can get more than enough yardage for an entire project for under $5. Crazy deals! I snagged over 60 yards of fabric, mostly knits. I forgot to snap pics, but I plan to post a bit more tomorrow.
On the home front, I’ve been working on some simple envelope covers for some sofa pillows that no longer match my decor. I’m even snazzing them up with some hand embroidery.

After my little shopping spree, I went back to the studio to get some more painting done. Julie is graciously allowing us renters to use (and even paint!) her leftover slat wall, so I painted mine in the perfect shade of orange!
I really meant to start blogging again at the beginning of summer vacation. While that didn’t happen, I’m adopting Maddie’s attitude about success, and admitting that some great sewing things have been happening, even if I haven’t been following my blog dreams.
First, I have been sewing! Hooray! I’ve finished a couple Laurels and a McCall’s skirt, and I’ve cut out at least four more patterns that I have yet to start. I even dipped into my dear, patient home decor stash and whipped up a quick sofa pillow (it was so quick…I’m not sure why I was procrastinating so). I’m almost finished with all the projects from my Craftsy Beginning Serger course (the first time I’ll actually finish all the projects from one of my gazillion Craftsy courses!).
I’ve also been spending a few days here and there teaching at my dear friend Julie’s kids’ summer camp (infinitely better than teaching summer school). This summer semi-job has led to some very exciting recent developments in my sewing situation!
To make a long story short, Julie (who used to run a vintage/handmade shop along with teaching sewing classes) is getting out of the retail game to pursue teaching and making full-time. That meant a massive liquidation of her vintage holdings. For me, it meant the chance to snag some awesome additions to my sewing supplies.
First up, a dress form!

I’ve been holding off on getting one of these until my measurements stabilize (hopefully at a wee bit smaller than they are now), but this adjustable number was just too good to pass up.
Next, I found myself the proud owner of a new sewing machine!

It’s a Pfaff 2320! Now, I have a definite attachment to my little Brother (purchased at Costco for somewhere around $200), especially with its wide array of feet (it came with a walking foot!) and drop-in bobbin loading. However, I am well aware that it is not the best machine one could own, and despite religious servicing, I’m not super-happy with the stitch quality. This machine feels much sturdier and the test stitches I’ve done look much nicer. It doesn’t have all the feet and features that the Brother does, but I don’t really use most of those things regularly, and the quality of this machine is far superior. I’m still lusting after a top-of-the-line Bernina, but this should tide me over while I daydream/save for the other.
I also scored the newest addition to my ever-growing fabric stash:

It’s a gorgeous vintage Vera print!!!!!!!! I’m not sure of the exact fiber content, but there’s definitely some synthetics in there. It is absolutely gorgeous and in great condition (look at how white the white is, right?). I’m not sure what I want to do with this yet, but it will definitely be a special project.
So, what was the best thing I added to my sewing arsenal over the past few weeks? Believe it or not, it was not the gorgeous vintage fabric, the German-engineered sewing machine, or the adjustable dress form. Nope, it was a place to put them all! Now that Julie has cleared out her retail stuff, she has enough space to start renting out studios!!! I’ve got dibs on a little space next to a local designer (I feel simultaneously fancy and super-intimidated).

It may not look like much now, but it has huge potential, and I have pretty much free reign to make it what I want! Even better, Julie’s loaning me some of the awesome furniture, shelving, and even slat walls that are already in the space. For a girl who’s currently crawling around her floor to cut out patterns and shoving fabric into every possible nook and cranny, this is a dream come true! I can’t wait to start moving in!
Despite spending several days away from my precious sewing space this spring break, I was able to finish a Modcloth knockoff that I’d cut out about a month ago (before spending three weeks in Seattle caring for my broken-legged mama). Before leaving for Seattle, I used the same pattern to make a little lumberjack dress, so I decided to combine the two into one post.
I’ll start with le knockoff. I first spotted this adorable dress while fantasy shopping a few months ago:

Source: modcloth.com via Joy on Pinterest
Although I didn’t have any boucle, my stash did contain some textured red mystery suiting fabric that I acquired while a member of the Julie’s Picks club at Fabric Mart. I also had a copy of Burda 7739 that I had already sewn a few times before. I grabbed some white sateen for the top from JoAnn’s, and I was ready to go.
Et voila! My version:

Obviously, my version, lacks the awesome waistband of the original, but I’m reasonably happy with the results.


I’m pretty comfortable with this pattern by now, so it was easy to make some simple changes. I shortened the invisible zipper so it only extends about 3/4 of the way down the bodice rather than down into the skirt. I’m still refining my invisible zip insertion skills, and in the other versions I’ve made, the zipper shows up horribly where the skirt and bodice meet. Incidentally, I have a metal invisible zipper foot for my machine that doesn’t seem to work for me at all. The cheap-o plastic one I got from JoAnn’s works much, much better. Go figure.
I also made the Peter Pan collar by slightly adjusting the existing pattern piece. I finished the collar with bias tape using Megan Nielsen’s awesome tutorial. I also opted for bias finishing rather than facings on the sleeve openings, where I omitted the pattern’s cap sleeves. I also omitted the faux button placket/buttons. While the pattern calls for pleats, I gathered the skirt instead to mimic the gathering on the original.
The lumberjack version of the dress followed the original pattern much more closely:

Again, I used some fabric I have in my stash. In this case, it was some cozy buffalo plaid flannel that I got at Golden D’Or, a giant fabric warehouse here in Dallas.
On this version, I kept the original pointed collar, sleeves, placket, and buttons (although they blend into the plaid pretty well).
The main modification that I made was omitting the back zipper entirely. I knew from previous versions that I could actually slip the dress over my head without unzipping, so I decided not to worry about it for this version. I also modified the collar so that it was one piece instead of two. I thought this worked better given that there was no zipper splitting the collar.

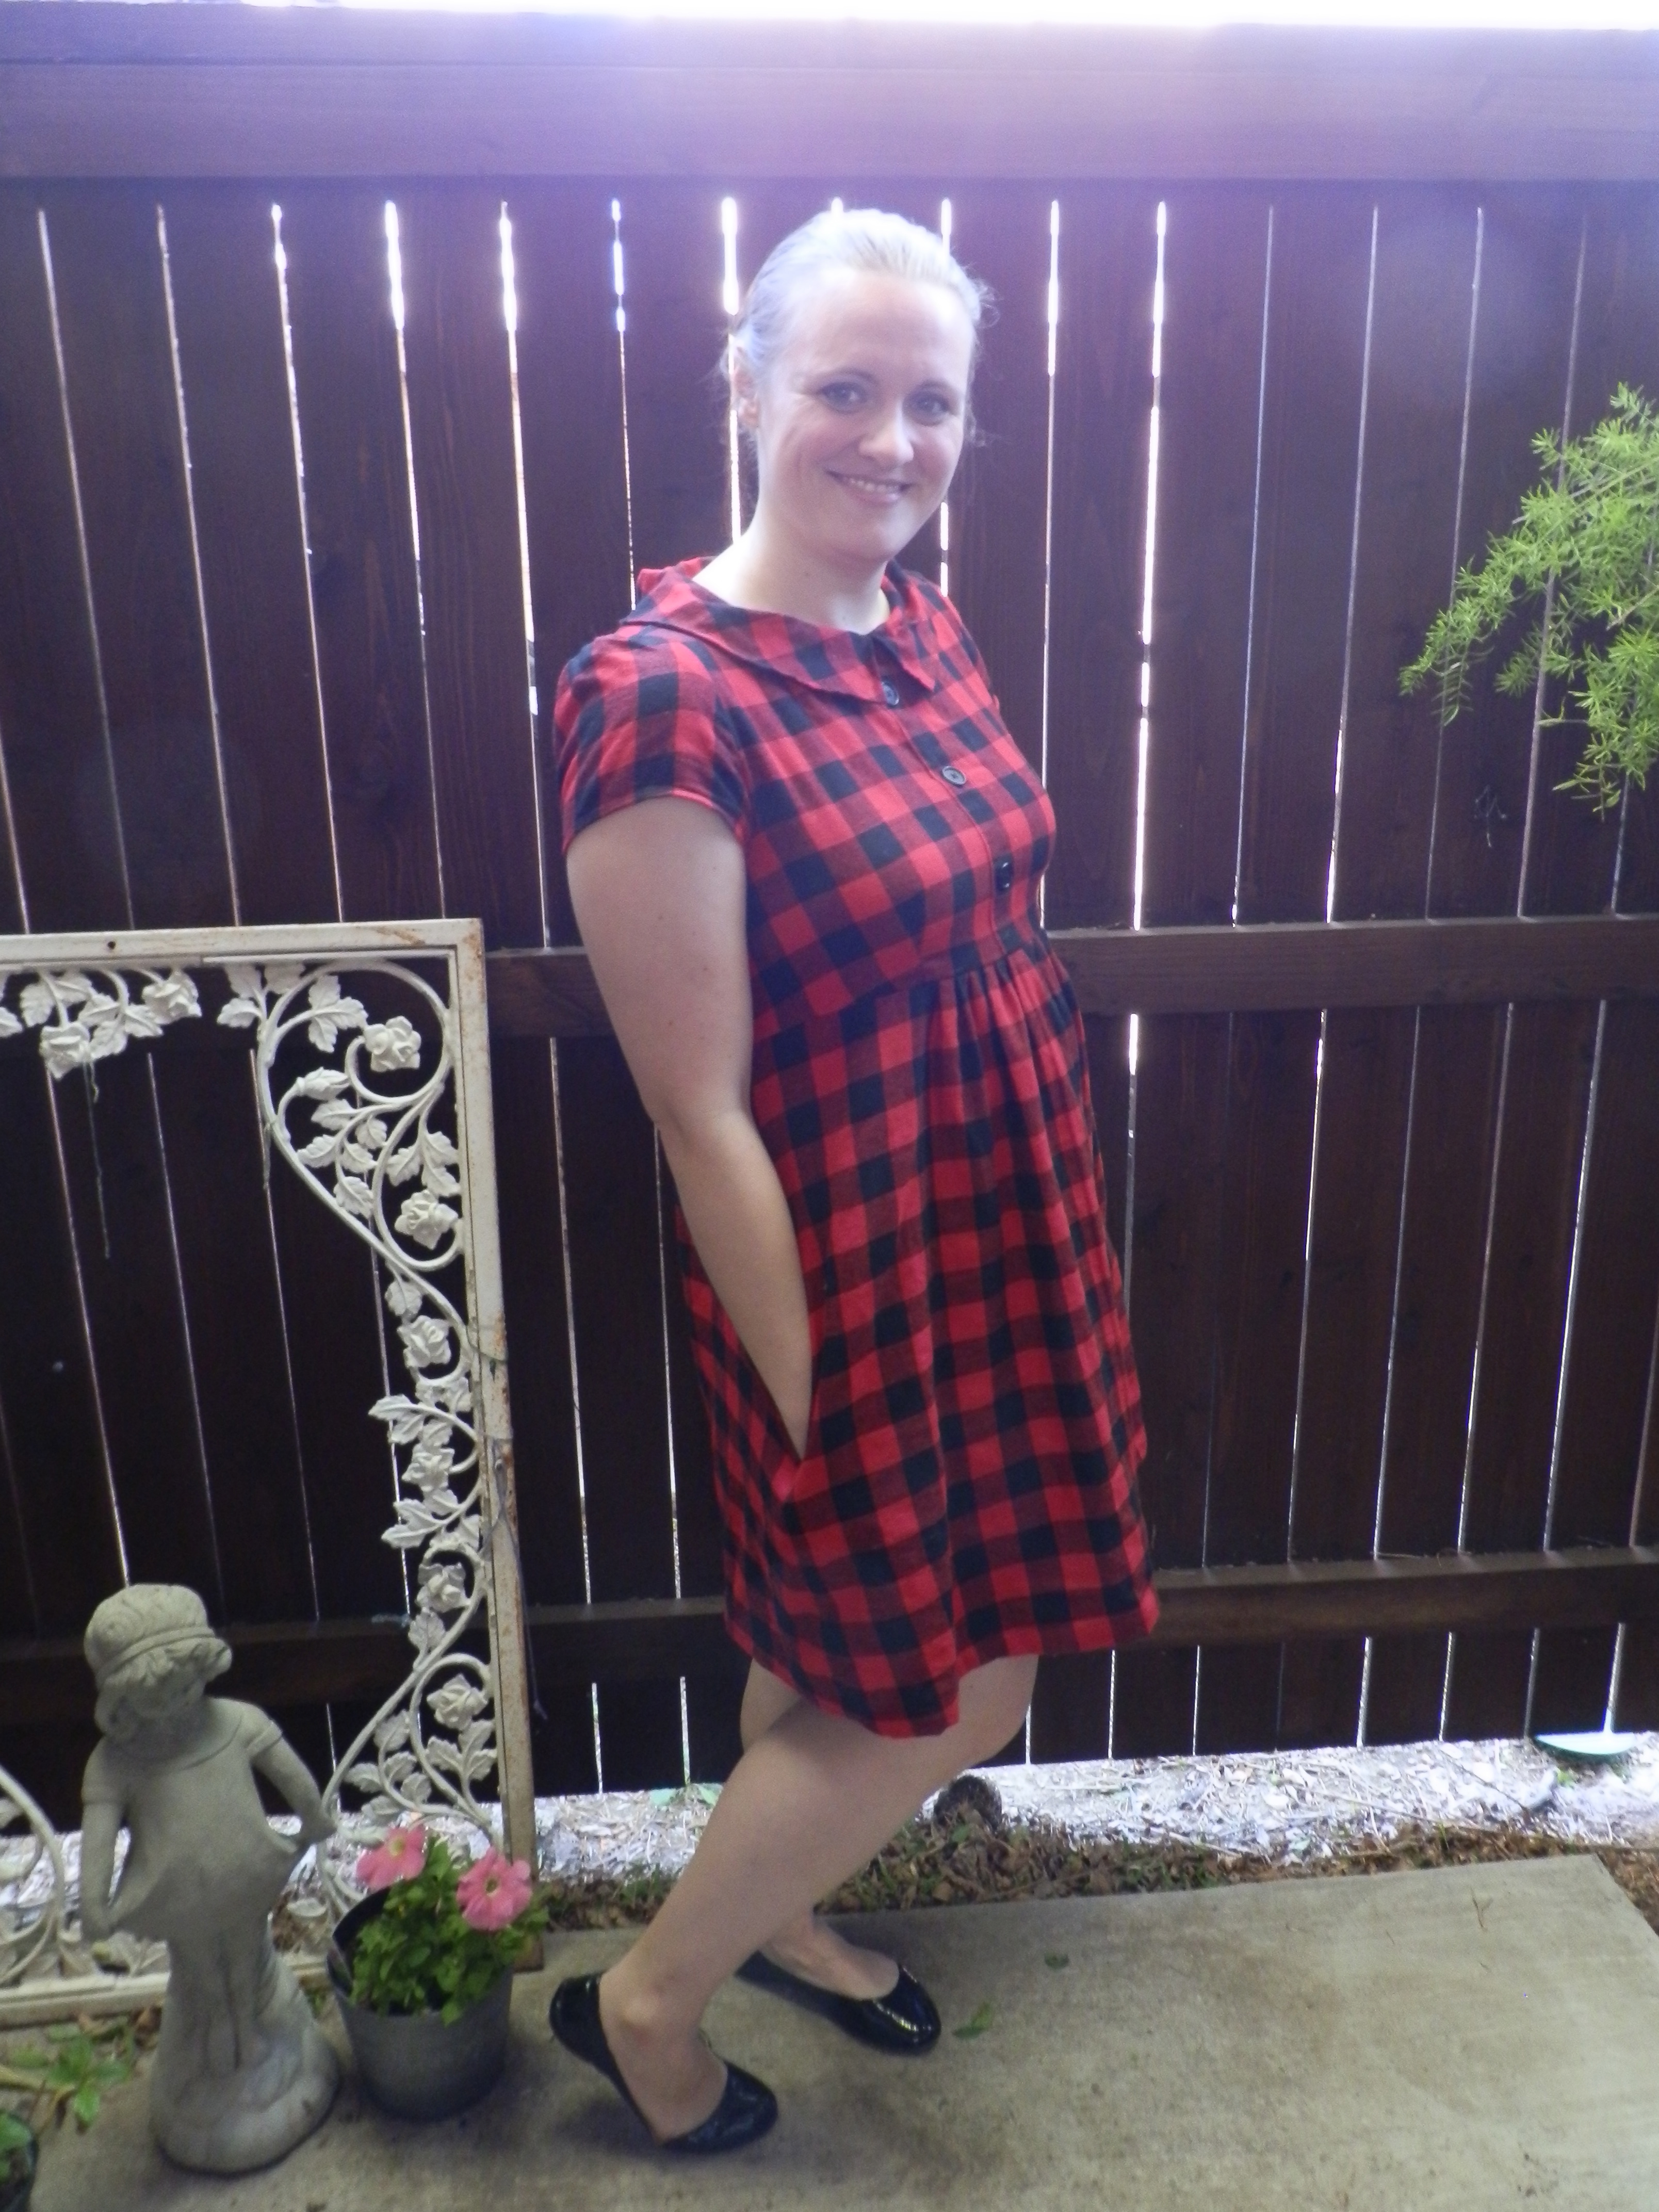
All in all, I’m happy with these dresses, and I’ve already worn both of them a couple times each. That being said, I think I’m ready to move on from this pattern for a while. The collar pieces are a weird shape, and on the red and white version they protrude oddly in the back (or maybe I’m just now realizing that I have a hunchback?). I also don’t particularly love how the sleeves pouf out. I suppose I could fix these issues, but I’m ready to move on to something new. Lucky for me, the Archer Sew Along starts tomorrow! I’ve already cut out my muslin. I think I’ll follow along this week using that fabric, then try to catch up next weekend. I did get my two fabrics washed thanks to my dear friend Clare, who also took these photos for me. 🙂
And now, please forgive my cheesy elementary school teacher method of summarizing these makes –
Glows:
1) The lumberjack dress was my first time working with plaids. While I didn’t match everything perfectly, it wasn’t terrible (maybe would have been better if I’d use my walking foot???).
2) My invisible zipper skills are getting much, much better!
3) I underlined the skirt on the red and white dress (despite being thick, the fabric was a bit see-through, and it was a loose weave that frayed like crazy. This is the first time I’ve used the technique and I think it worked pretty well. I tried machine basting the two layers together, which did not go over well. Uncharacteristically, I went back and ripped them apart then hand-basted. If only I could maintain that kind of work ethic with all my sewing.
Grows:
1) Aargh! Crazy pointy darts on the red and white dress! I should have pulled them out and redone them. I can sew lovely darts, I swear. I think I was just being lazy. Same goes for the uneven gathers. I didn’t want to take my time and redo things that needed redoing (or just more care doing them the first time). My goal was to finish this dress before leaving for dog-sitting, so I just powered through. I do much better when I work in smaller spurts and don’t have deadlines. The same laziness shows on the lumberjack dress on the collar. I forgot to cut out interfacing. I didn’t want to go back and do it, so I decided the dress could live without out. That limp, floppy collar is calling my bluff.
2) I want my makes to be pretty on the inside, too! The knockoff is a MESS where I inserted the zipper and around the pockets. The rest are nicely serged, but they could still be better.
I never met a novelty print I didn’t like. Unfortunately, I also tend to dislike the finished result when I use quilting cottons for apparel sewing. They wrinkle easily and don’t always drape the way I’d like. Hence, my love of Spoonflower. I can choose my own novelty prints in whatever sort of fabric I’d like. Huzzah! During some recent explorations of the site, I decided to purchase Heather Ross’s Prints.

It was there that I first encountered her idea that anyone can learn to draw. It has been my lifelong assertion that I am a terrible artist, but a recent nostalgic foray into Ed Emberly drawing books combined with Heather’s comments gave me hope. Then, when I saw this post on her blog challenging other drawing newbies like myself to treat drawing like exercise, I decided to give it a go. Unfortunately, I read the post too late to join the contest myself, but I started this morning with a sketch of my kitty and of a clock in my boyfriend’s mom’s house. I like the clock a lot better than the cat, but they actually both came out better than I thought they would (okay, they’re definitely not great, but my normal drawing is barely better than what my first-grade students come up with).


Maybe I’ll be on my way to fabric design sooner than I thought.
The holidays are here, and I’ve been crafting up a storm. As soon as I have some decent photos, I actually have some finished projects to share and several more in the works. I’ve also recently rekindled my love of knitting. A few weeks ago, I even learned how to make cables! I made the Rosie pattern from Stephanie Japel’s Circular Knit Lab. Although I started it for myself, my sister wasn’t shy about requesting it for herself. Here she is modeling it:

And here’s the back view, where you can check out my newly acquired cabling skills:

With the rest of my spring break, I’m planning on (finally!) making a Meringue and joining in on the Archer sewalong! I printed out the pattern and I’m hoping to get it put together tomorrow (and maybe even cut out some muslin pieces). Today, I reached the halfway point of Holla Knit’s Scallop of the Sea pattern. Speaking of shellfish, I’m happy as a clam with all my progress as of late.

